
I'm crazy for mechanical cards and popupcards. For a while now...
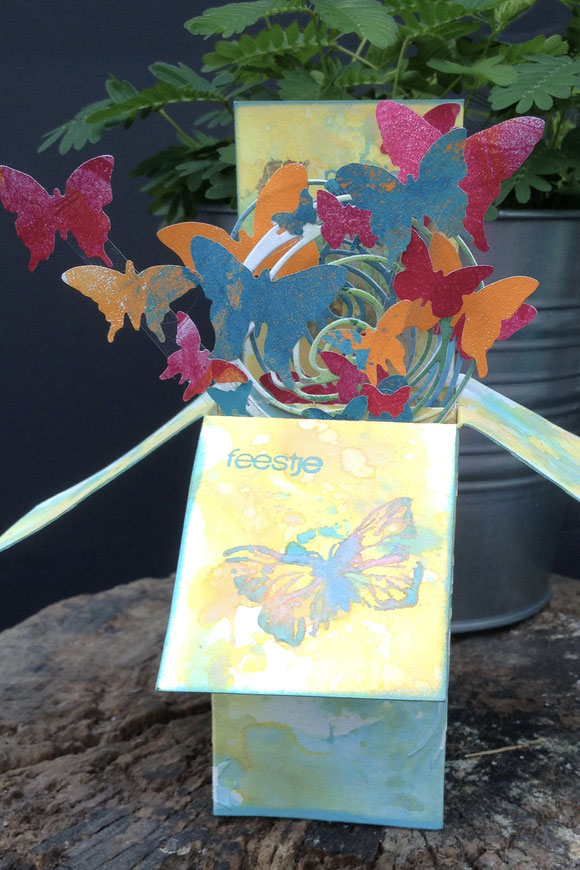
This year all the people that get a real birthdaycard from me, get these popup boxcards.

When I was asked a few weeks ago if I wanted to be a guestdesigner on the blog of Els Brige, I said immediately : "I would love to ! ".
Els is a young local designer and to my joy she makes stamps ! Nice Dutch textstamps are not so easy to find and she has now her own and I love them ! And she even has some dies from them too...Definitely worth to have a look at her blog and shop !
Guestdesigner and crazy for popup cards... well.. what else could I show ?;)
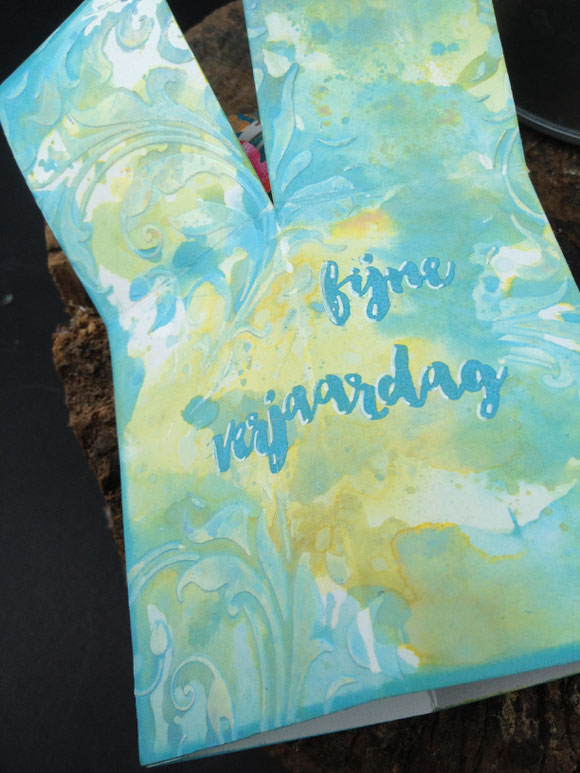
A few days before the request I recieved the long-awaited distress oxide inks from Tim Holtz.
This card is one of my first attempts and experiments to use the inks.
If you would love to make your own, here is a little tutorial :)
First you start with a sturdy 300 gr paper.
In the downloads ( choose English or Dutch) you can see the sketch and the measurements and also where you have to cut and score the card.
The measurements for this card makes a card that fits in a regular A5 envelop.
I first brought texture on my paper with texturepaste (optional). I just scraped the paste through a stencil (Tim Holtz) and let a dry.
I put a bit of distress oxide ink on a smooth underground, spritz it with water and then dragged the card through the colors.
I spritzed drops of water on it, while drying with a heatgun.
This process was repeated several times until I had a result that I liked with several colorlayers.


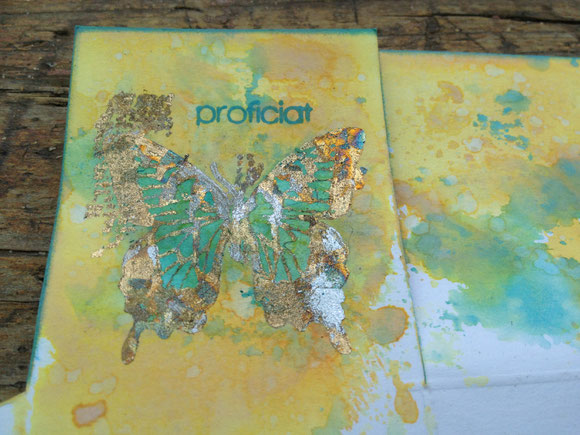
"fijne verjaardag" ( Dutch for happy birthday) is one of the textstamps of Els from the set "'t is je verjaardag". I guess this is one of her stamps I use the most !
I inked the stamp with the distress oxide ink broken china. To hightlight the word a bit more, I added a white shadow on the left with a white gelpen. It's a little detail, but really makes the word pop.
Another detail I always add is inking the edges of my card. I really find that it draws the eyes of the viewer to the inside.


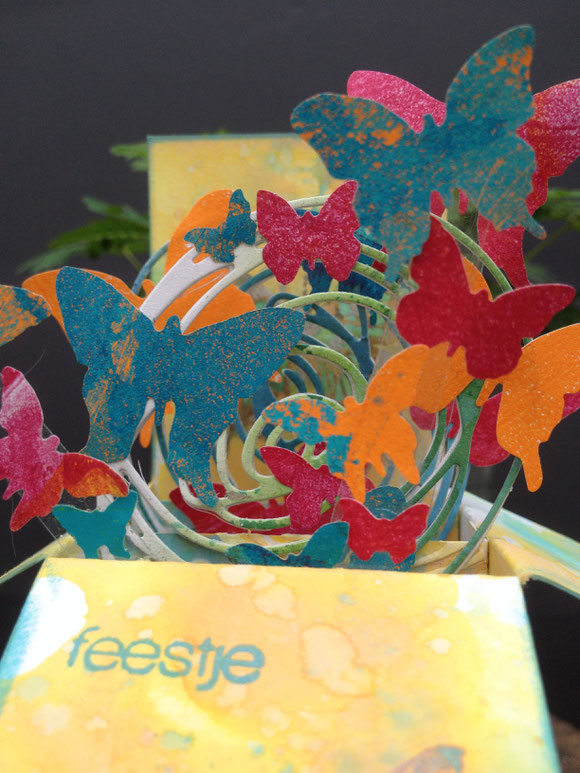
More textstamps were added from the birthdaysstampset ("proficiat "en "feest") AND a butterfly covered in metal flakes (peacock flakes of Indigo Blue).


One thing I also really, really like is make my cards from scratch: this means starting from a white piece of paper.
By adding paint, ink, stamps,... you can make a unique background.
I did bought embellishments in the past and I admit, there is gorgeous stuff outside, BUT... I don't seem to use them !
Give me some white paper, some ink and a stamp or a diecut and I make something myself.
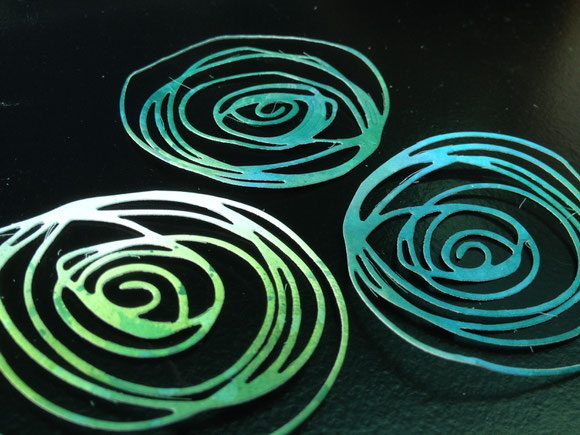
That's what I did with the circles: paper colored in layers with the distressoxides and then I cut them out with diecuts from Tim Holtz.
Aren't they gorgeous ???? I like them a lot.


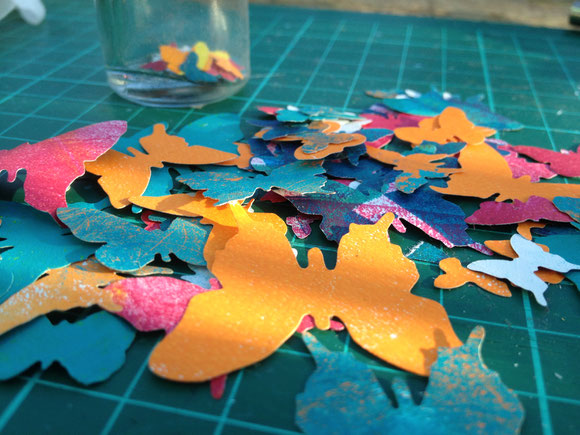
I also "hoard" leftover pieces of gelliprinted paper. My gelliplate is one of my tools I really couldn't miss in my crafting.
When you need one of a kind butterflies, what better way to use up these scraps and diecut butterflies with a Tim Holtz die ?


When all the "preparations" are done, then it's time to start the assembling.
To make the butterflies "fly", I add them to strips of plastic that are pieces of packaging ( yes, I hoarder that too ;)
The box is assembled (see on the PDF download how). Two strips are added in the box. That's where all the fun stuff is added on !


All the embellishments are added on the inner strips.
One thing that's important is to check constantly if the embellisments stay inside the box if you fold it.
So I add for example a butterfly on a plastic strip. There is doublesided tape on the bottom of the strip. I don't push it down hard, but first fold the box flat to the right. Does it fit in , then I can secure the strip by pushing it, if not, I pull it off and move it a bit.
This is a process that I repeat with everything I add.
This is how the boxcard looks when it's flat.
It fits in a regular A5 envelop and needs no more postage than a normal letter.
When the reciever, get the boxcard out of the envelop then is when the fun and the surprise starts !


I hope you liked this explanation of how I made this popup birthdaycard.
Most of all, I hope you get inspired to try them yourself and make them for yourself of your loved ones as a gift !
greetings from Belgium
Inge
PS: would love to hear what you think of them and if you made them !

Reactie schrijven
Lisa (vrijdag, 21 april 2017 03:22)
It's so good to see you back! I've always loved your posts. I haven't posted on the Tim group for a long while myself, but I always keep up with them. So glad you are feeling better, and what a great project!
Karen (zaterdag, 22 april 2017 11:46)
Great to see you back Inge, and with such a colourful card.