
"fun" is definitely the word that should accompagny the word "gelli plate"...
I don't know why it took me so long to buy a gelliplate from Gelli Arts...
I have been experimenting in the past with monoprinting on a selfmade gelatin plate and I both enjoyed doing it ànd the results.
The fact that it takes time to make the gelatin plate and that it desintegrates quite fast, didn't make gelatinprinting into a regular craftmoment.
I've heard the buzz on the blogs and on pinterest about the gelliplate of Gelli arts, watched some videos and when they released recently a big plate (12/14 inch or 30 cm/35,5 cm) I finally bought one.
It's not cheap, but knowing that it will last ànd knowing I will it use often, makes it worth the buy.
It arrived from the Netherlands past monday.
Being busy with the reports for my handicapped children of my Poppy class means lots of hours behind the computer... This means stress, a heavy head full of thoughts, tired eyes,...
So, why not pulling out the plate just before getting in bed and give myself the perfect relaxation ?
It works :)

Every night I watched a video on gelliplate printing to get some ideas and every night before heading to bed I played with the gelli plate.
Fun, fun, fun... and lots of nice papers and if not... just print over it !
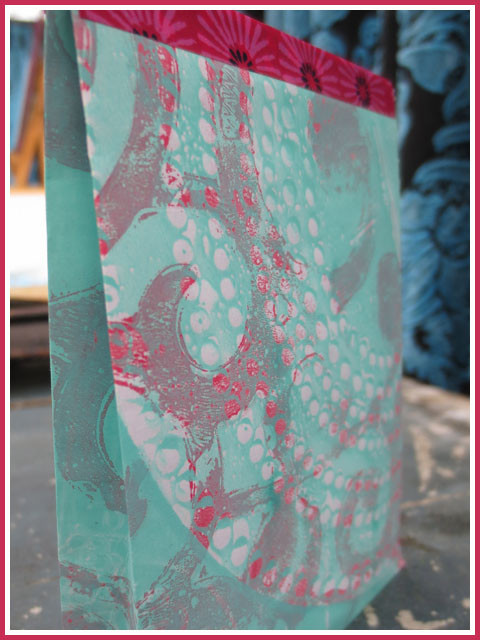
I used one of my papers to make a little bag with the "in the bag die" ( Tim Holtz).
Pefect to hold an ATC with a soldered pendant on.
This was a commission I got from Evi, one of the nurses in our school.

She lost her mom and her grandparents. She and her husband are also longing for a child for a long time, but nature is not sweet for this couple.
Hopefully the doctors can give nature a helping hand... hopefully very soon...
She wanted a pendant which remembers of her lost loved ones and with a tree that represents her childwish... And if I could incorporate the ashes of her mom and grandma in it ?
And so I did... On a leftover scrap of stamped paper I embossed a green tree ( green is the color of hope).
On the left three hearts with the first letters of the names of her loved ones.
On the right a heart with her husbands first letter and an extra heart... hopefully to be filled with several letters of future children...
I glued some ashes on the bottom of the tree. Her loved ones have taken care of her in the past and her "roots" will stay connected with them for ever.
They will give her strenght to grow in whatever the future brings.
I loved to make this pendant for her because it means so much for her. Hopefully the love I felt in making it, wearing it with love,... will make dreams come true? ... I hope...

As the gelliplate I bought is big, it's perfect to make all the papers I need to make my photobooks.
This birthbook is a gift for a friend, commissioned by an excollegue.
She provided me with the birthannouncement and some photos of the little Julian.
I took the colors of the birthcard as an inspiration for the colors of the bookcovers.

I used several colors ( yellow, orange, red, green) on the gelliplate and rolled the paint open in strips.
I added some texture with an "orange bag net" and then printed the paper.
When it was dry I added dots with one of Dyan Reaveley's stencils and heavy gel medium and let it dry overnight.
I cut the letters of the name " Julian" out of two sided tape with the wordplaydie ( Tim Holtz). I decreased the stickyness of it by taping it on my tshirt and pulling it off again, because I needed the letters as masks and the glue may not pull off my paint when I remove them !
I added the masks on the paper and inked my gelliplate with two blue paints, added rubberbands randomly and printed the covers.
I let the paper dry and then sanded off a bit of the paint on the dots made with gelmedium.

I made a collage with the photos and printed it on canvaspaper.
With some batting in between I sewed this collage on top of the paper.

Then it was time to cover the cardboardboards with this paper.
I made new papers for the inside of the covers and the protectionpapers on the first and last signature.
I used rubberbands again as masks to create visual interest.

I used some leftover strips to cover some of the backs of the signatures to add a bit of color on the spine.
Then it was time to assemble to book and sew it with the copic stitch !

DONE !
I'm really curious how the mom and dad of Julian will react on this completely handmade book...
I really had fun making it and the gelliplate is my favorite friend to make all my papers for future books.
But I won't forget experimenting with the gelliplate for fun and relaxation !
greetings from Belgium
Inge

Reactie schrijven
Stephen (maandag, 03 juni 2013 23:10)
Isnt it addictive? Great Job on the book.
Nancy (dinsdag, 04 juni 2013 08:06)
Inge, I went to a class last month about one person’s take on using the gelliplate! I plan on doing more with it myself, so I welcome any and all experiments others have done using it. I splurged and bought some silicone squeegee tools to use with it, too…can’t wait to find the time to play.
Lisa H (dinsdag, 04 juni 2013 17:38)
Oh your prints are so cool!! (must resist Gelliplate… ack)
Deb (dinsdag, 04 juni 2013 19:01)
LOL, can see you really using this alot! with your imagination it will be the sky is the limit
Deb
Lisa H (dinsdag, 04 juni 2013 20:11)
I'm still trying to resist the gelliplate. It looks like SO much fun and your prints are beautiful! When are they going to put a few extra hours into the day??
Kathy Paglia (woensdag, 05 juni 2013 07:54)
Inge
You are incredible! Your art is amazing. Congratulations!
Sarah (zaterdag, 08 juni 2013 13:21)
It sure is fun. Did my first class today with them too. I sure got messy.
I will be ordering the 8*10inch tomorrow.
Just one question though. What is the best paper to use with the gelli plates?
Tomorrow I have class with Jane Davila (from Conneticut) and Jane Davenport. Really looking forward to them.
Cheers
Patricia (maandag, 10 juni 2013 09:33)
Inge is in een paar woorden gezegd "een echte kunstenares" met een speciale gave om van kleine dingen "grote kunstwerken" te maken!